When your internet connection gets disturbed, it’s not only annoying for the whole family but can even affect your entire workflow or lifestyle. We know how important a stable network connection is in today’s world, so we’ve compiled a comprehensive list of ways to prevent dead zones (spots where your internet cuts out) in your home.
It's important to note that none of the items on our list will ever make your Wi-Fi speed faster than what you're paying for or reach farther than your router’s promised range. We’re here to help you get the most out of your service, and ensure that your connection covers every little corner of your home or workspace.
With that in mind, let's dive into our expert tips on how to extend Wi-Fi signal range in your home.
15 ways to extend your Wi-Fi signal
1. Change or upgrade your internet plan
If you're struggling with a less-than-stellar connection, it could be a sign that it's time to change your internet provider. Does your connection often get interrupted, even if you're right next to the router? Does your YouTube buffer constantly? Does your Wi-Fi get significantly worse during the evening when everyone gets home from work?
Consider switching your internet service provider (ISP) entirely if these situations sound familiar. We encourage you to find the best ISP in your area, especially in a remote location.
If you find that your provider is indeed the best for your location, see if your ISP offers better plans with more data or faster speeds. More often than not, you get what you pay for with network providers, so an upgrade might fix your internet problems.
2. Try a Wi-Fi range booster
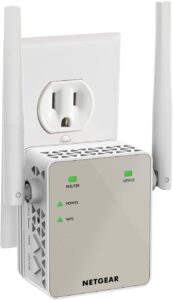
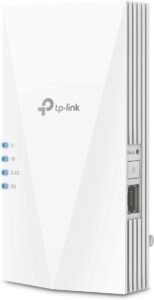
If you’re still getting dead spots in the house and the issue isn’t on your internet provider’s end, invest in a Wi-Fi range booster to bolster your signal strength. Wi-Fi boosters grab your existing Wi-Fi signal and amplify it to spread farther into your home. Or, if you dream of streaming Netflix in your backyard, consider an outdoor-specific Wi-Fi booster.
Device | Price | Special Info | Details |
| $32.20 | ● Compact size
● Plugs directly into an outlet
● Dual-band frequency
| See on Amazon |
|---|
| $69.99 | ● Wireless
● Fast (up to 1.8 Gbps speed)
| See on Amazon |
|---|
Remember: Wi-Fi range boosters aren’t going to fix a speed issue, pretty much ever. If the best signal you get is still slow, a Wi-Fi booster will extend the range of your slow signal to more areas. Still, if you ask us, it’s always better to have at least some diluted signal than none.
3. Strategic router placement
Positioning your existing router in a better location is a quick way to strengthen your signal. Putting your router too close to the ground or walls might worsen your Wi-Fi signal. Wi-Fi has difficulty reaching you through thick walls, concrete, and multiple home levels. Routers distribute signals in a round but horizontal pattern, so, in most cases, a central and open location will get you the most comprehensive signal coverage across your home or workspace.
However, if you're trying to strengthen your signal in one specific part of your home, like an office, the ideal location would be to put the router directly in that room, even if it’s far from the center.
If you need the best connection but still want a good signal in the rest of the home, it may be best to relocate your workspace closer to the router in that centralized area. Basements can cause the most interference due to concrete
Wherever you choose to place your router, it should be set up so that your Wi-Fi can take the path of least resistance.
4. Elevate your router for an enhanced signal
If your router currently sits on the floor, elevating it can make a significant difference in your signal strength. Minimize interference from your furniture, walls, and floor by placing your router on a high shelf or on top of the furniture.
Routers send out your Wi-Fi signal in a horizontal pattern, so leaving them too low to the ground will actually let the floor (carpet, hardwood, anything) absorb some of the signal. The more signal the ground absorbs, the less there is left for you to use.
5. Keep firmware up to date
Regularly updating your router's firmware will fortify your network's security and help the device run at peak performance. As a result, your Wi-Fi signal will reach as far as your router can send it. Most modern hardware regularly checks for updates and automatically installs them, but if you want to ensure you're running the latest, here are some steps to manually update the firmware.
How do you update your router’s firmware?
This won’t look the same for everyone, but here’s the general process for how most routers can be updated:
- Locate your router’s IP address.
This is typically listed on the back of your router. If you have trouble finding it, call your internet provider.
- Type the IP address into Google.
You will be prompted to log in. The username and password are typically located on the back of the router or in your router’s manual.
- Look for an Updates or Firmware tab
This step may not look the same for every router, so if you don’t find it immediately, try browsing around the page for words like Advanced or Manage.
If an update is available for your router, it will typically show either a firmware version number or a date. Look for the most recent update possible and select download. Then, follow your specific router’s prompts.
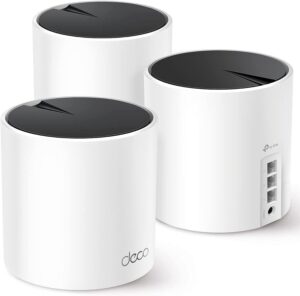
6. Get seamless coverage with mesh Wi-Fi
If you’re struggling with your Wi-Fi’s speed and signal and are prepared to invest some time and money into resolving the problem, you might consider installing a mesh Wi-Fi system.
Mesh Wi-Fi uses multiple access points (nodes) to provide seamless connectivity throughout your space. Instead of relying on just one router, these nodes each act like their own little routers, working together to pass the internet signal back and forth. The nodes can be installed in any area of your home and can even be wall-mounted to avoid cluttering up your furniture.
7. Try a powerline adapter
While the process is kind of complicated, you can extend your network manually by setting up powerline adapters. They’re a lot like ethernet cables, but without the chaos of cables all over the floor that totally clash with your new rug.
How do powerline adapters work, and how do I use them?
Powerline adapters use a two-adapter system to travel through your home's electrical wiring and upgrade your Wi-Fi signal.
Here’s how it works (in real-life terms)
- One adapter plugs directly into your wall outlet.
- An Ethernet cable connects the first adapter to your router.
- A second adapter plugs directly into a separate wall outlet
- Plug whatever device you want to connect into the adapter.
After they’re connected to your router, the power source, and then your device, the adapters then work together to use your home’s electrical wiring to amplify your Wi-Fi signal.
The trade-off with this option is convenience. Powerline adapters are amazing at signal amplification, but setting this system up is time-consuming and could get costly, depending on the adapter you decide to purchase and how many devices you want to be able to connect at one time.
8. Select the least crowded Wi-Fi channel
To keep it simple, think of a Wi-Fi channel like the mail carrier that your Wi-Fi sends its mail (data) through. The best mail carrier will get the mail there faster and without any disturbance. So, just like when you send something through the mail, you want to pick the least busy carrier—or channel—to do so.
Your router will come already set with default Wi-Fi channels. Usually, these are the channels its internal tech thinks will be the best for the average user.
However, your router isn’t policing what’s going on outside your home, so it doesn’t know if your entire neighborhood has the same network service and you’re all fighting for a piece of the bandwidth. In this case, manually tinkering with your Wi-Fi channel settings may be the answer to your slow internet woes.
Here’s a general guide on how to do just that:
- Type your router’s IP address into Google
- Log in using the username and password given on the back of your router
- Look for “settings” and “Wi-Fi channel”
- Disable automatic settings and set to specific channel numbers
Different frequency bands will change what channels we recommend to you. Based on the information from Intel’s expert support page, we recommend channels 1, 6, and 11 to you if you’re using 2.4GHz. If you’re browsing on 5GHz, we recommend setting your channels to 36, 40, 44, and 48.
9. Know which frequency band to connect to
Use our breakdown below to decide which Wi-Fi network to connect to, depending on where you are or what you need it for. Connecting to the right frequency will help you extend your signal to the right devices in your home.
2.4 GHz | 5 GHz |
| Wider signal range | Smaller signal range |
|---|
| Slower speeds | Faster speeds |
|---|
| Ability to pass through obstacles | No ability to pass through obstacles |
|---|
| More signal interference | Less signal interference |
|---|
We recommend using 2.4 Ghz for your devices that travel the farthest from your router, like your phone and laptop, because its signal reaches farther. Whatever devices you use in the exact central location where you place your router (like your TV) will perform much better on 5 Ghz so that you can enjoy the frequency’s speed.
10. Use a Wi-Fi analysis tools
Wi-Fi analyzer apps are like a three-in-one tool for getting rid of dead zones in your home or office. They can help you identify where the dead zones in your home are so you know where exactly your router should be, show you the traffic volume on specific Wi-Fi channels, and even show your signal strength versus those around you. We recommend Wifi Analyzer Lite as a free option to those on PC (not Mac compatible).
11. Upgrade to a modern router
You might think buying the latest and greatest router technology can be a waste of money, but if your Wi-Fi is underperforming, you’d be surprised how much a new model of router will make a difference. Consider upgrading your router if your current one is outdated and secure a more potent signal range for your household.
12. Optimize router settings
You may not be aware, but you can actually set your router to prioritize specific devices or applications and make sure what you care about is getting the most bandwidth.
For example, you can fine-tune your router settings, such as Quality of Service (QoS), to extend the most energy to streaming and let file downloads be the last priority. When movie night rolls around, you can enjoy your Netflix stream with no interruptions and let your game download later, all without even thinking about it.
13. Fortify your network security
You can set up security measures to prevent unauthorized users (like that pesky neighbor) from consuming your bandwidth and making your signal worse. A password-protected and secure network will allow you to get the most out of your Wi-Fi signal.
According to the Federal Trade Commission, resetting your router and administrative passwords is a great preventative security measure in general; and a bonus side-effect is that anyone who might have found your password without your permission will suddenly lose it. If you’re paying for your Wi-Fi, you don’t want random freeloaders using up all your precious bandwidth.
14. Unexpected interference
We know it sounds totally absurd, but your microwave might be disturbing your Wi-Fi signal.
If you’re connected to your 2.4GHz network, your microwave and your Wi-Fi are operating at the same frequency. Minimize interference by relocating your router away from the kitchen or the direct path of the microwave, and you should be good to go again.
15. Clean your devices and accessories
A dust-free router is less likely to overheat, ensuring you’ll get consistent performance, your full Wi-Fi range back, and a longer lifespan for the device. It also ensures that your antennas aren’t blocked, reduces signal interference, and contributes to a stable and reliable Wi-Fi connection.
Remember, expanding your Wi-Fi signal may involve a combination of our fifteen strategies listed above. The most suitable approach depends on the layout of your space and the specific signal challenges you encounter.
Now that we’ve covered the practical steps you can take to extend your signal, let’s dive deeper into some devices that can make a really big difference. We call them the superheroes of weak Wi-Fi signals: Wi-Fi extenders.